Showing posts with label Home Projects. Show all posts
Ah, these sunshiny summer days...blogging just doesn't seem to happen much in the summer. Trips, family outings, visitors and just relaxing is much higher on the priority list. However, I did want to bring you a few posts of summer. Starting with my oar wall!


Easy to make oar wall.

It's a whole wall of oars!
I've been collecting oars for a few years-- just waiting for enough to create my wall. 
The little antique shops on the island know me by name. Garage sales, junk sales, craft markets have all helped me with my collection.

An oar gallery wall.  Perfect for a large wall in a beach home!

Yes, I know this doesn't work well in every home, but in a beach home...I love it!
This post contains affiliate links to help you locate products.

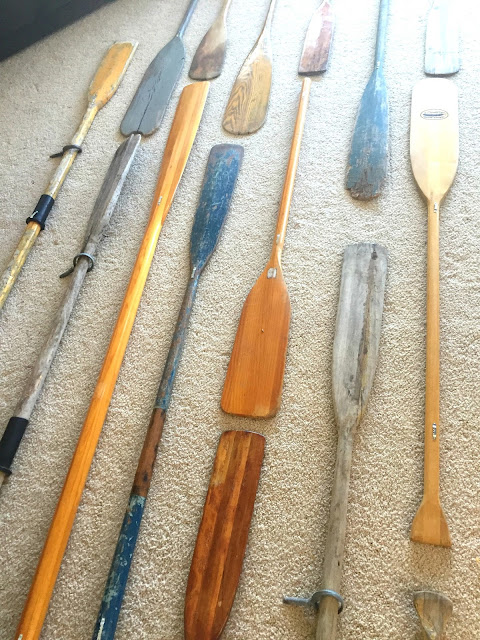
A collection of oars--ready to go on the wall!

Obviously, the first step in creating an oar wall is collecting oars. Mine were all different. Some vintage, some just old. Some in terrible shape, others looked pretty good. Some long, others short. I loved the ones with old chipped paint and the ones with the oar locks still on them. I did end up staining a few so I could get a darker color on my cream wall.

Hang an oar on the wall.

The next step was figuring out how to hang them.
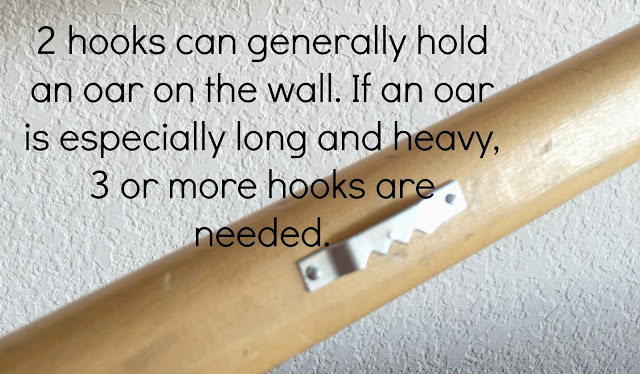
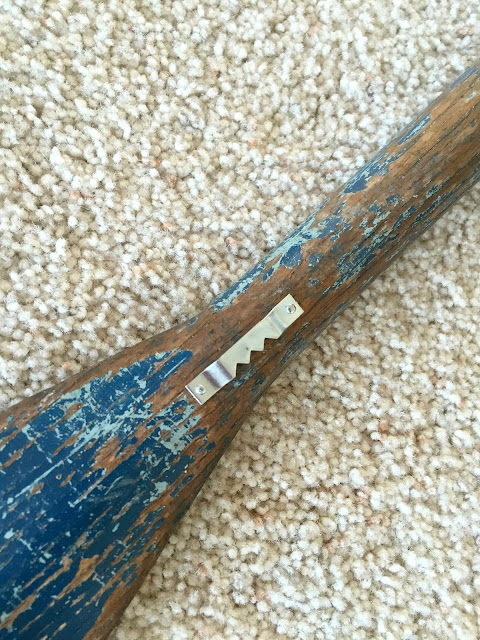
We used picture frame hooks on the back of each oar. The hooks are so easy to nail into the wood oars and can safely hold a bit of weight.

Hang an oar on the wall.


Hang an oar on the wall.

AH (Awesome Husband) helped me. We put one hook on the handle of the oar and another one close to the paddle. If an oar was longer, we used three hooks.

Creating an oar wall. One paddle at a time.

I laid out the pattern I wanted on the floor.  Colored oars next to wood oars. Older ones next to newer ones, etc. Mixing up the directions of the oars added to the charm.


Creating an oar wall. One paddle at a time.

We measured the wall and determined how many rows we could create with spacing in between. We couldn't even come close to being exact in our measurements, due to each oar varying in widths and heights, but we did our best. We pounded nails into the wall, hanging one oar at a time, measuring AND eyeballing as we went.


Vintage oars on the wall.

Now, here's the hardest part...stopping!  There's a part of me that wants to keep collecting oars and adding more and more...but yet, it's important to call it done and be done and be happy.

Oar wall- perfect for a home by the water.

And maybe I'll start a different collection for the other blank wall?
Hmm...mermaids? Haha!
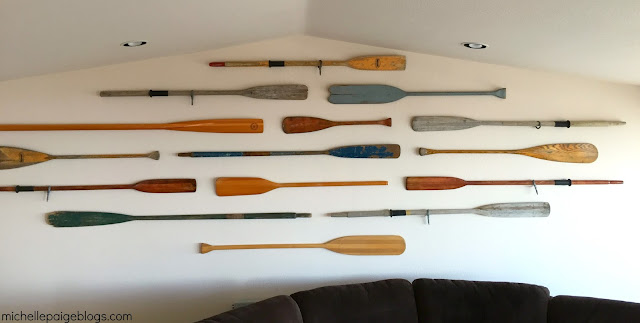
Beachy Oar Wall. Perfect for a large wall.


If you follow me on Instagram you saw me working on another summer project...a driftwood star.
Click here to make your own...it's so easy!
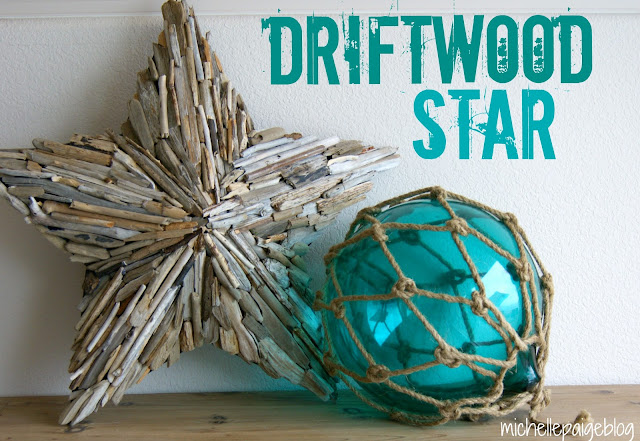
Got driftwood?  Make a star!


Happy Summer!


Vintage Oar Wall

Monday

Tie-Dye Pillows

Never in a million years did I think I would be tie-dying.  Is that even a word?
I'm not really a fan of the tie-dye look, even though I was a child of the 70's.  Nowadays, I seem to see tie-dye everywhere I turn.  I'm not sure if the trend is still 'trendy' or on it's way out again?
Anyways...

Jennifer from the smart and clever craft blog, Delightfully Noted, came up with this CrAzY Old School Mystery Craft Challenge.  Not sure what I was thinking when I volunteered to do this, but it's too late now...


Click here to read all about the challenge. 

She basically mailed 9 crafters some old school craft products.  (Pony beads, potholder makings, plastic twine, etc.)  So, you'll never guess what she sent me in the mail?  Yes, of course you'll guess. I was really hoping for the moldy Bedazzaler! 
Our job was to craft up something fun with our product, take pictures and have blog readers vote on their favorite craft.  There are prizes involved, too!

 
So, for me it was a tie-dye kit.  Of course I couldn't choose which pattern I wanted to try...so I tried all of them!  (Well, 4 of them.)
 
Spiral, Stripes, Crinkle and Ombre.  I used the one color that came in the kit-- blue.
 
It wasn't hard following the directions.  I used a white cotton material and went to work.
(I have to admit it was pretty fun!)  Just remember to wear plastic gloves!  You'll thank me later.
 
After soaking overnight, washing and drying, the color came out more turquoise than royal blue.
This was actually a fun surprise, since I LOVE turquoise!
I ironed up the fabric and sewed up a few easy pillow cases with a Velcro opening.
 
 
Ta-da!  The finished products!  Which pattern is your favorite?
 

I took the pillows over to my mother-in-law's beach place for the perfect chairs to highlight them. 
My mother-in-law loved them!


Who knew that that this 'old' process of dying fabric was so fun and addictive?  A big thank you to Jennifer for challenging me to get out of my comfort zone and try something new.

I'd love you to vote for my project!  Click here to vote.  I'm #6!  You'll love what others made, too!  People are so creative!


 Thanks Friends!  Happy Summer!

Not sure if you saw my 10 Reasons on Why You Should Paint Your Banister post, if you didn't, click here.

Today, I'm ready to show you how I painted my banister.

First, I should say that we all survived the whole ordeal. You may have had doubts reading my 10 Reasons post?
Next, I should tell you that this story does have a happy ending.  It turned out gorgeous and it was well worth the effort...and I believe, it turned into a focal point of selling our home!


Alright, let's get started with a before picture.


Solid wood, maple, I believe...with a whitewashed, bleached out color.  This banister looked very dated and completely blended in with the wall color and carpet.  In a perfect world, I would have ripped out the carpet, put in hardwoods and replaced the entire banister and spindles with something much more modern...possibly iron.  That wasn't happening, so painting was my only option.


The knobs on the banister had the most wear.  It was quite embarrassing, I mean this is the first thing you see walking in the house!  Disgusting!


So let's get started.
1st Step:  Taping
Applying painter's tape between every single spindle was a tedious task.  I wanted to protect the carpet and I did protect most of it, but it was not easy.  I went through a ton of tape!

2nd Step:  Stripping


This stripping gel almost killed us!  It said it had no harsh fumes, but my family totally disagreed!  Tons and tons of complaining!  I had to leave all the windows and doors open in January.  It was quite easy to brush on, but not so easy to sand off.


Step 3:  Sanding

 
Sanding and more sanding and more sanding.  I've never sanded so much in my life!
I did try to use an electric sander, but it didn't really work on all the curves and edges, so hand sanding is what I had to do.  I used sanding blocks, but mostly just sheets and sheets of sandpaper.

What a horrible job!  Dust everywhere, EVERYWHERE!  So time consuming! 

 
This is when I kept asking myself..."What have I done?"  "What was I thinking?"  "Am I crazy?"  Yes!  (At one point I started naming each spindle.  I was spending so much time on each one, we had some how became friends.)

 
There was no stopping now, but I did have to stop.
I was hosting a birthday party and company was coming, and I was no where near finished!  I couldn't leave my house looking like a construction zone...I had to clean up my mess and leave the project unfinished.  Ugh.

 
Step 4:  More Sanding
 
It was so painfully hard to keep going, I had lost steam by having to stop in the middle.  I just wanted this stairway done!  I had read stories online of others finishing this project in a week-end.  One week-end?  Really?  No way!  I was on week 3? or was it 4, no 5?!
(Don't ever believe those one week-end projects!)


Finally, the sanding was completed!  The orange stripping gel was all sanding off.  The spindles and banister were down to the raw wood.  (Or at least it was done according to my standards.)


Step 5:  Dusting, Vacuuming, Cleaning

 
The dusting part wasn't too bad.  I vacuumed up everything I possibly could.  I then tried using tack cloths, but apparently I don't have the right touch?  They turned into a sticky, messy, waded up ball.  Want to know what did work?  Baby wipes.  I love baby wipes.  I wiped down every nook and cranny and edge I could find.  I re-vacuumed and did my best to get the area dust-free.


Step 6:  Staining and Painting

After everything was as clean as I could possibly get it, it was time to paint!  Yay! My favorite part!  I was so ready to see some progress!  I started with painting the railing first, then the spindles. 


I used Minwax PolyShade Stain in a Classic Black.
I was so nervous that I made a bad choice, but it was perfect!
I did have to use some tiny brushes to get the stain on the underside of the railing and around the spindles.  It wasn't a perfect job, but it worked.  I was so happy!


I did have to be a bit careful to look for drips and to make sure that no bristles were left behind.
I did three coats-- yep, it took a while.

The white spindles were painted with a basic white gloss paint.  I did three coats of the white as well.  They actually could have used another coat or two, but I wasn't going there!  I was done. Done!
(By the way, painting a round object, is not fun!  Drips, drips and more drips! Slow painting is the key plus constant looking all around the spindle for drips!) 

This is a fake smile.


Are you ready to see the after pictures?  Of course you are!!

Step 7:  Stand back, admire and enjoy!

 
Look at it shine!  Look at those knobs! My family was amazed!

 
The glossy stain had just a hint of the wood grain showing through, it looked so good!


I couldn't believe my eyes!  What a difference a painted banister makes!  Why didn't I do this sooner?
 
(Isn't that what everyone says once the project is done?)
 
 
Our realtor even highlighted the staircase in the home pictures.  I know that wouldn't have happened, if I hadn't painted it!


**Side note:  If I had to do it again, and didn't have carpet to worry about...I'd probably paint the spindles black as well.  Hopefully, I'll never have to paint a banister and spindles again! 

Click here to see our staged home.


The Idea Room

Before and After of Painting a Banister

Monday

 
You've seen so many people re-stain and re-paint their banisters themselves and you think, "Can I really do that?" 
You love the fresh, painted, updated banister look, but wonder,
"Will I really be able to pull it off?" 
Well, have no fear, folks...I'm here to set you straight.


Reason #1. You love projects that never end! Projects that go on for days, weeks, months...those kind of projects give you extra energy and enthusiasm.
Yep!


Reason #2. You enjoy the smell of the orange scented stripping formula that leaves a sticky goo on everything, causes headaches and forces your family to leave for days.
Right on! 


Reason #3. You appreciate getting feedback on your project every time a family member uses the stairs.
Oh, yah! 


Reason #4. You have been thinking about adding blue painters tape to your permanent stairway décor.
Pretty!


Reason #5. You delight in the sounds of sanding and re-sanding and even more sanding as you breathe in the smell of sawdust.   Mmm! Bring it on!

Reason #6. You believe that flying dust is entertainment.  You love to watch the layers of acrobatic dust moving in the air, attaching to every piece of furniture, molding, mirror, pillow, curtain, etc.  Whoohoo!

Reason #7. You get excited about taking multiple trips to the hardware store to buy more sandpaper and more brushes.
Sign me up!


Reason #8. You think that black stain drips on your white carpet is trendy.
That's right!


Reason #9. You believe that brush hairs, dust and those dried paint drips all add character to your railing's appearance.
LOVE!

And finally, Reason #10. You've been wanting to help God work on your patience.
Amen!

 __________________________
So...what are you waiting for?


Liniing up to TT&JLink P

10 Reasons Why You Should Paint Your Banister!

Thursday

Amazon Associates Disclosure

Michelle Paige Blogs is a participant in the Amazon Services LLC Associates Program, an affiliate advertising program designed to provide a means for sites to earn advertising fees by advertising and linking to Amazon.com

Instagram