twitter facebook instagram bloglovin google plus pinterest youtube

Sunday

My dear friend battling breast cancer always writes such beautiful, thoughtful letters and thank you notes.  However, the cancer treatments have taken a toll on her body and energy.  She's no longer able to keep up with handwriting notes to everyone who has helped her...yet, she so desperately wants to.
She recently asked me to make her simple and sweet thank you notes with just enough room to sign her name.  She needed the cards completely ready to hand out to her friends as they gave her meals and gifts.


After discussing a few ideas with my friend, here's the result:
A colorful basket of thank you notes!
Take a look!


Peppermint sticks all tied up.


Your meal 'mint' so much to us!
Thank you!


Orange paper card with a candy orange slice tied on top.


'Orange' you sweet?


$1. pack of blank printed cards tied with purple ribbon and a chocolate bar.


Inside reads: I love you more than chocolate!


Mini-size Almond Joy bars with tag attached.


Tag reads:  You bring me so much joy!


$1. pack of blank printed cards cut down.
One candle tied onto the card.


Inside:
Your meal brought so much
LIGHT
to our day...
and a fullness of love to our hearts (and tummies)!
Thank you for your love.


Party poppers (TNT style)


You are dynamite!


$1. pack of printed blank cards


Stamp inside:
Thanks!
Love you so!
(Both stamps are from Michaels)


I labeled dividers in the basket to organize the cards.
(Basket purchased at JoAnns.)


My friend was overjoyed!!!
This simple gift was able to lighten her load tremendously.
I had so much fun creating these fun cards for her...I hope she'll need more soon!
Love and prayers to you, Ruthanna!


_______________________________

Linking up to: Craftomaniac, Iheartnaptime, EmbellishingLife, TodaysCreativeBlog, StrictlyHomemade,
Gingersnapcrafts, SkiptomyLou, BeyondthePicketFence, SassySites, FrugalGirls,
DelightfullyNoted,


Visit thecsiproject.com
 photo arrow.png CONTINUE READING

Wednesday


Remember this old window I brought home from the Junk Show? 
Well I FINALLY did something to it!

Want to see?


Here it is!

(I know it's summer, but this was supposed to be a spring project, so spring pics it is!)


I did a bit of washing (it was dirty!) and sanding (it really needed it!).
Followed by a coat of primer and some white paint.


And of course lots of window cleaner on the panes (front and back!)


I had my 'awesome' husband hang a white picture ledge between our old sconces in the living room.
(I'm currently on the lookout for some new 'complimentary' sconces.)


I took these bright pictures of my kids at the tulip fields this past spring. Remember?

I chose about 8 great pics and had them enlarged to an 8x10 size.  Costco only charges $1.49 a piece.


I played with the pictures until I liked the arrangement.
Because all my pictures were taken horizontally, I turned the window sideways so the glass panes were horizontal.


Using scotch tape, I taped each picture in the back of the window sill. 
Scotch tape will make it easy to pull out the photos and add new ones later.


Unfortunately, my window panes were about a half inch wider than my photos.
(See the light coming through?!)


No problem that a little paint can't fix!
I (very roughly) painted an edge on the glass all the way around each window pane.


Can you see the painted border?


 Definitely a 'rustic, shabby chic' look!


There you have it!  It adds so much color to the wall. 
I can't wait to re-fill it with some beach photos and then some autumn leaves
and then some snow shots and then...and then...

______________________________


.
 photo arrow.png CONTINUE READING

Thursday

Got Driftwood?
 
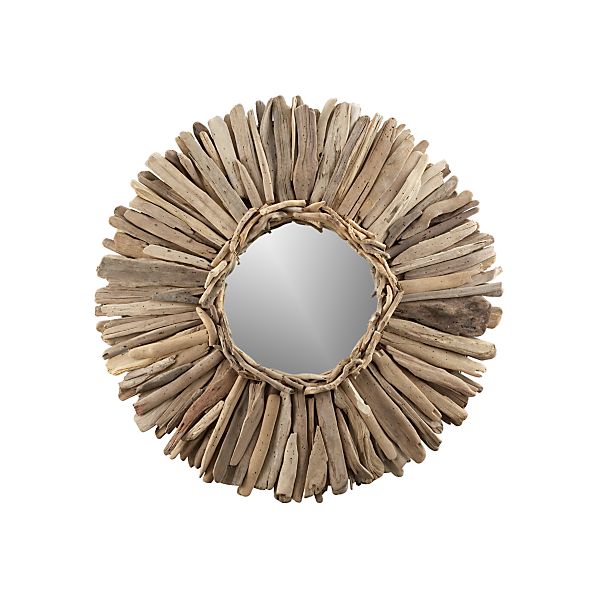
The above Driftwood Mirror from Crate and Barrel. is very lovely. (Sorry, they no longer carry this item, but don't worry...keep reading.)
It's catalog description reads:

"Rings of rustic beauty, straight from the beach. Hand-harvested driftwood, only available a few months a year, is meticulously assembled by skilled craftsmen into each unique frame.
Made in the Philippines."
Cost: $199.00 + $26.95 shipping = $225.95
Hmmm...

This is our backyard at Camano Island.
Are you thinking what I'm thinking?

Yep!

Make Your Own 
Crate and Barrel Driftwood Mirror
for about $15.
(The Puget Sound Version)


Here it is!
_____________________________
Supplies I used:
-Round mirror with a round, wood frame
-Gray or brown colored paint, paint brush
-Lots and lots of driftwood!
(on many WA state beaches, driftwood is plentiful!)
-High-Temp Glue gun and lots of glue sticks
-Heavy hanging wire
-Hair dryer (optional)
________________________________

Let's get started!


First, find a round mirror that already has a flat, frame.


It is somewhat difficult to find a round framed mirror,
especially when you're looking for one!
I finally picked up this beauty
at Goodwill for $8.  Perfect!

Next, paint your mirror frame.


My son saw me painting and asked if he could do it.
(I never turn down help!)
We used some leftover khaki-colored paint we had
from painting a bathroom last year.

Now it's time to hunt down some driftwood!
Grab the kids and hit the beach!


You'll need lots of driftwood pieces!! 
Try to find pieces that are flat on one side (they'll glue down easier!)
Look for lighter in weight pieces, don't go for the heavy ones!
Take more than you think you'll need---trust me!

Don't forget to pick up lots of small little driftwood sticks, too.


Give all the wood a bath with the hose. (Great job for the kids to do!) 
Wash off all the sand and little bugs and set the wood out to air dry.
If it's a sunny day, the drying won't take long...
if you live outside of Seattle you may be waiting awhile!

Now the fun part!
Lay out all your pieces on top of the mirror frame.
As you start working with the wood and laying the pieces out,
you'll find that many pieces just don't fit.  Too round, too bulky, too big, etc. 
You might even need to go out and gather more wood, mid-project!  I did!
Try using some smaller pieces on top of the bigger pieces.

At this point during the project, I must mention that here in the
Pacific Northwest, our driftwood does not all come in the same lengths.
(Apparently driftwood in the Philippines is different?)
Some pieces will stick out further than others. 
It didn't bother me...hopefully it won't bother you. 
I sort of like that 'sunburst' style...plus I wasn't going to sand down my wood pieces!


When you think you have a nice looking layout, start gluing.
I applied hot glue directly to the frame and some glue to the wood as well.
Use lots of glue (even more than I used in the above picture!)


I had my daughter help me with the gluing,
(someone had to take pictures, right?)
Be sure to press and hold the wood on the glue for a bit,
before moving onto the next piece.


Once the big pieces are all glued down, it's time for the tiny pieces.
Work the tiny driftwood sticks into the edges of the mirror and glue down.
Also, look for spots that the big pieces didn't cover. 
Wedge smaller sticks in to cover the open areas.
Be sure you cannot see the painted frame peeking out.
I ended up gluing some of the smaller sticks directly to the mirror.


A hair dyer is helpful getting all the loose hot glue fibers off!
This tip works great with any glue gun project!


Now stand back and take in the natural beauty of your mirror!
If your mirror didn't come with hanging hardware, attach heavy duty wire!
This mirror is heavy!


The hardest step may be finding where to hang it?!
Quite the conversation piece, wouldn't you say?

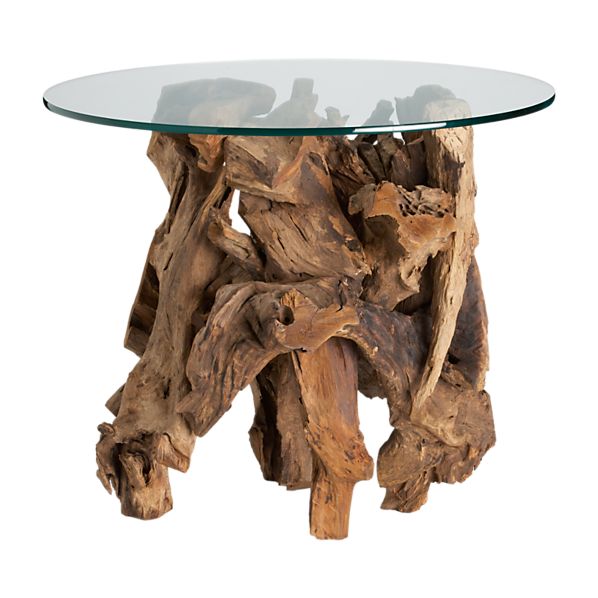
Look what else I found on Crate and Barrel's website?


A Driftwood End Table!  Only $399.  Hmmm??


 photo arrow.png CONTINUE READING

Monday


I'm bringing the beach indoors-- to my mantle.


Yep, after finally taking down my 4th of July Red, White & Blue decorated mantle, I decided to go with the ever popular, but oh, so refreshing...beach theme!
I thought I'd share with you my recipe for a beach inspired mantle...
(I totally made this up...I'm not a beach-themed decorating expert, however living 3 summers on Camano Island and subscribing to Coastal Living Magazine gives me some expertise, right?!)

Michelle Paige's
Recipe for a Beach-Themed Mantle

STEP 1:  Clean off mantle. (Pack up last season's decor and start with a fresh slate! It doesn't hurt to dust off the mantle a bit before you get started...mine was slightly overdue.)

STEP 2:  Bring in some beach glass.  Look around your home for some large glass elements to add...preferably light blue, turquoise  or green hued glass.
(How cool is this big, aqua glass beach float...complete with rope!)

Which brings us to Step 3...

STEP 3:  Add some thick beachy rope, twine or netting.
(I spotted this roped glass float at a store on the island, and fell in love with the color!)
(I'm still on the lookout for some beachy fish netting.)


STEP 4:  Place a model ship next to your beach glass...preferably a sailboat to help you feel the calming waves and light breeze!
(This cute, wood boat was found at a garage sale...I couldn't pass it up!)
(The turquoise glass jug vase was on clearance at JoAnns for $5. last spring.  Love it!)
 
And finally finish off with...


 STEP 5:  Add in real beach finds! Think driftwood, shells


crab claws? feathers? mussel shells! oyster shells! barnacles?!


fishing line?!

(This driftwood sculpture was created by my son at Delzel Art Camp on Camano Island.  Jacob collected driftwood and treasures off the beach, then hammered, glued and even hung some of the pieces together. Quite an original piece of art...I love it!)


And there you have it!  A beach-themed mantle!


After all steps are completed, sit back, admire and enjoy summer...before it 'sails' on by!

_______________________________
Linking up to:
(Apparently I have been blogging for 6 months now! I'm almost NOT a new blogger!)
Also linking up to:

Visit thecsiproject.com
 photo arrow.png CONTINUE READING