twitter facebook instagram bloglovin google plus pinterest youtube

Thursday


Quick letter ornaments with stickers.


Easy Lettered Ornaments with Stickers
Make these easy ornaments with no fancy cutting machines...just stickers!
Seriously!  You wouldn't believe how easy it is to make custom ornaments for your tree with just a few simple supplies.
Take a look.

Supplies:
-A box of solid colored round ornaments.
(I used glass, but this could easily work on plastic ornaments as well. I bought mine at Michaels 50% off.) 

-2-3 packages of letter stickers (Choose narrow letters for best results.
I used this brand.)

-Beacon 3 in 1 Crystal-Clear Craft Glue (affiliate link)
-coordinating ribbon
-ornament hangers (these are my favorite!) (affiliate link)


DIRECTIONS:
Are you ready for the easiest directions I've ever posted?


Sticker ornaments.

1) Stick the letter stickers on the ornament and press firmly.

Spell out words like LOVE...


Fast handmade letter sticker ornaments.
Love sticker ornaments.
Quick handmade ornaments.
Fast ornament making with stickers.
I spelled out:
PEACE, JOY, NOEL, CHRIST, HOPE, MERRY, BLESSED, LOVE.

You could even spell out names for place settings.

Quick letter ornaments with stickers.

2) Once the stickers are firmly pressed onto the ornaments, let them sit for a few hours, then look at them closely. You will notice that certain letters will have edges that have peeled up. This is where the glue comes in.
Using the 
Beacon 3 in 1 Crystal-Clear Craft Glue (affiliate link) and a small paint brush, brush on some glue under the raised edges. Press firmly and let dry.


3) Tie on coordinating ribbon, add an ornament hook and hang on your tree. These could be packaged up as a gift set as well.

Quick ornament making with stickers.


Make your own letter ornaments.


The simplicity of these ornaments stand out on the tree. They remind us all what we should be focused on this Christmas season.

Black and white Christmas tree with handmade ornaments.
Quick letter ornaments with stickers.

 Wishing you and your family a very Merry Christmas!


 photo arrow.png CONTINUE READING

Wednesday

It's time for a Baby Shower!
When the whole family enjoys skiing and the baby is due in January, you MUST have a snow shower, right?  Of course! Take a look.

(This post contains affiliate links to help you locate products.)
Snow Party for a Baby Shower


Church Baby Shower for a Baby Boy

The shower took place at our church. I used long folding tables and placed dividers covered with gray tablecloths behind them.
Light blue and gray balloons as well as a snowy garland was hung near the top.White foam snowflakes 
(affiliate link) were added to the tablecloth background with stick pins. No tape needed!
Baby Shower Decor
(This post contains affiliate links to help you locate products.)
Mini silver tinsel trees and mini flocked trees 
(affiliate links) lined the tables.  Silver cake stands elevated the trees. A few glittery snowflakes on stands were set about, as well as fluffy snow, blue, white & silver ornaments and sparkly ribbon.
I also added these amazing soft snowballs. They are so fun for decorating and for playing with!

I did add a bit of real cedar greenery that was cut off from our tree. I LOVE having a cedar tree in our front yard!
Snow Party decorations

Some ladies in the church helped with fruit platters and treats. A few of the items were labeled to go with the theme, such as...
Baby Shower treats
Baby Shower treats

Baby Shower treats

Baby Shower treats

Baby Shower treats

I was really hoping to find some white cotton candy, but never did. I thought cups of it would have been the cutest 'snow drifts'!  Next time!
If you've read my blog before, you'll recognize the donut hole tree.
I've made them for a few parties (like my brother's donut party and my daughter's Favorite Things party.) A stryofoam cone 
(aff link), covered in plastic wrap and donut holes stuck in the cone with toothpicks. It's always a showstopper!
Baby Shower treats

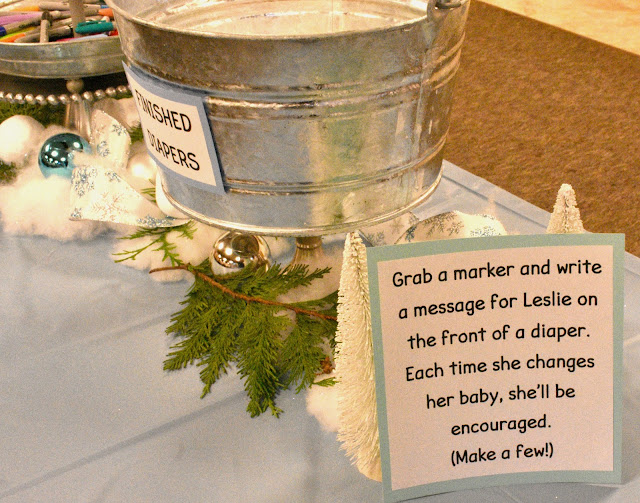
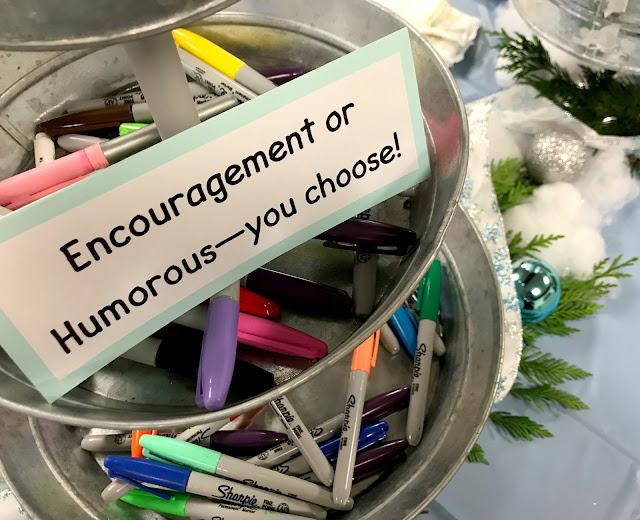
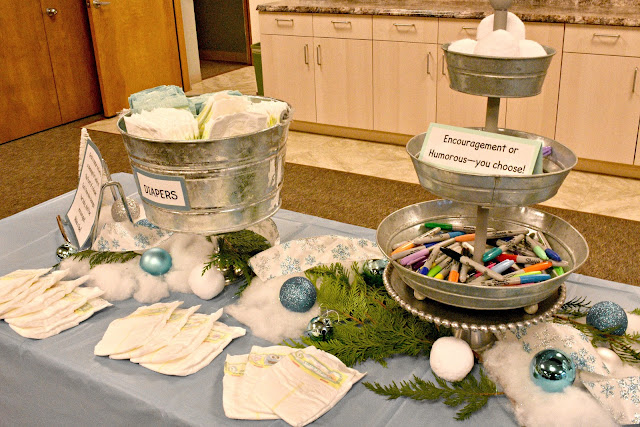
On one side of the room I set up a 'diaper writing table'. This was a great activity for guests to do as they arrived.

Diaper Activity at baby shower.

Diaper Activity at baby shower.

Large galvanized buckets (affiliate links) held the diapers. One bucket labeled, Diapers, the other bucket labeled, Finished Diapers.
Guests were to take a marker and write an encouraging or humorous note on the front of a diaper, for the mom to read as she changes her baby.

Diaper Activity at baby shower.

Diaper Activity at baby shower.

After the ladies had wrote on diapers and had treats and drinks, we had a short devotion from our Youth and Family Pastor. She prayed over the mom and talked about what a joy it is to be a 'boy mom'. She also brought out an interesting scripture found in 2 Timothy 1:5 which encourages all moms and grandmas to pass on our 'sincere faith' to our children, just like Timothy's mom and grandmother did for him.

After the devotion we played the Left Right Game. 
A paper sack filled with 4 chocolate kisses was stapled closed and given to each woman in the circle.  Three of those bags had a winner ticket in them.


I wrote this Left Right Story last Mother's Day. I tweaked it just a bit, so it would work well with the shower.
Every time I said the word, 'Right', the ladies would pass their sacks to the right. Every time I said the word, 'Left', they passed their sacks to the left.
Lots of laughing and fun. When the story was over, the ladies opened their bags. Winners received blue gloves.


On the other side of the room was the gift table. Some church ladies donated money towards a group gift of diapers.

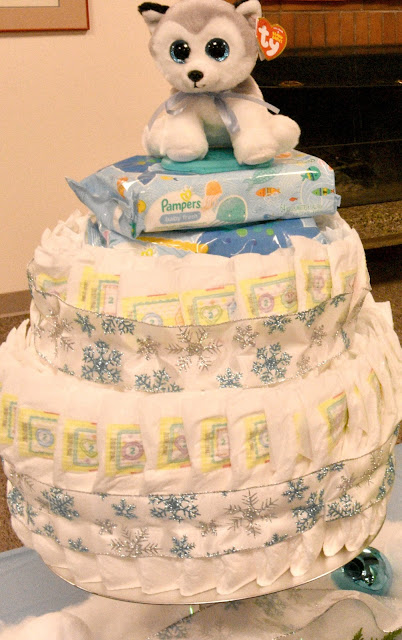
5 minute Diaper Cake

I made a diaper cake to go on the gift table--it's a 'cheater version' of a diaper cake. It's made with no rolled diapers...because no one has time for that! I may add a post with directions later, we'll see?
Everyone thought the cake was adorable. The puppy on top is a little gift for the baby's big sister.


Baby Boy Diaper Cake

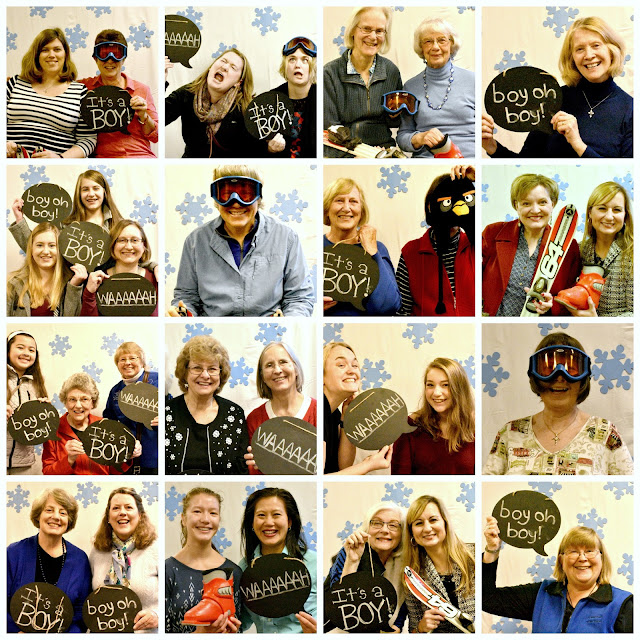
And of course, every party has to have a photo shoot! For the backdrop I used a white sheet and light blue foam snowflakes. Skiing props made the pictures extra fun!  I found these chalkboard speech bubbles at Target last year, but here is a similar one.

Snow and ski themed photo shoot.

Snow Themed photo shoot.

Snow and ski themed photo shoot.Snow and ski themed photo shoot.
Baby boy photo shoot.

Congratulations, Leslie!
Baby shower


Here's another shower...
FROG Shower


 photo arrow.png CONTINUE READING

Monday


Step by step directions to make Candy Turkey Necklaces.


It's time for another turkey craft! 
I don't know why crafting up turkeys are so much fun?  Could it be because they're so silly looking?  It may have something to do with their crazy wattle?  Or their weird shape?  Or all their feathers?  Who knows? 
These little candy turkeys can be worn as necklaces, or just sitting at each place setting on your Thanksgiving table.  They're very similar to the bat necklaces I made for Halloween. Remember?

Make Your Own Bat Necklaces
Click here if you missed that post.


Making a Candy Turkey Necklace

Step by step directions to make Candy Turkey Necklaces.
*This post contains affiliate links to help you locate products.

Supplies needed to make Candy Turkey Necklaces:
-small storage containers (from the Dollar Store or online- click here.)
-googly eyes
-hot glue
-black cording, ribbon or string
-colored fun foam in red, yellow and orange
-red ric-rac or red ribbon
-scissors
-Crop-o-dile or a very, very strong hole punch
-M&M's (or other small candies) 


Step by step directions to make Candy Turkey Necklaces.

First, using a hot glue gun, glue on two wiggly eyes to the container. 


Step by step directions to make Candy Turkey Necklaces.

Next, cut a small triangle out of the orange fun foam and a small piece of the red ric-rac.  Hot glue the nose and wattle in place.


Step by step directions to make Candy Turkey Necklaces.

Using this template- click here, cut out three fun foam feathers, one of each color.


Step by step directions to make Candy Turkey Necklaces.

Make tiny little cuts around the feathers.

Step by step directions to make Candy Turkey Necklaces.


Glue feathers onto the back of the container.  Place hot glue on each feather, before sticking on the next one.

Step by step directions to make Candy Turkey Necklaces.

Using a Cropodile tool, punch a hole over the dot. (This is my favorite crafting tool, ever! It punches holes through anything!Using ribbon, string or black cording, measure out about 30-33 inches.
Thread both ends into the hole of the lid, and tie a knot.
Tie a few knots to keep the cording from pulling through. I tied three knots right on top of each other.
Trim the ends.


Step by step directions to make Candy Turkey Necklaces.
Pull off any hot glue threads that are left.
Step by step directions to make Candy Turkey Necklaces.

Happy Thanksgiving!


Check out these turkey ideas, too!

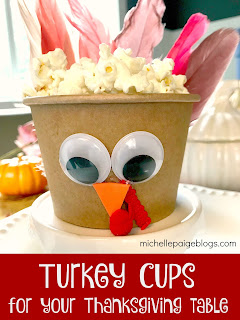
Popcorn Turkey Cups

Make turkey cup favors for Thanksgiving.


 photo arrow.png CONTINUE READING