twitter facebook instagram bloglovin google plus pinterest youtube

Saturday


It's time for another Sunday School craft!
AH (awesome husband) and I are teaching the Kindergarten/1st grade Sunday School class at our church. 
Last week's lesson was on Baby Moses in the basket.  I wanted to come up with a craft that the kids could take home and use to retell the story of Moses being found in the basket.
So, we made some baskets...well really boxes, but we're calling them baskets.


We used empty juice boxes, material scraps, paper towels and plastic tape.
Oh, and hot glue!


We had each kid drink a beverage.
We then wrapped brown material over the top half and the sides of the box.


A bit of hot glue kept the material in place.


We adhered the plastic tape over the seam of the material all the way around the box.


Using sharp scissors, a small rectangular opening was cut in the top of the box.
We had each child dry out their box with a paper towel.


Each child used a small piece of felt to wrap up a broken popsicle stick to make Baby Moses.
(A dab of glue helped the felt stick.)
Each child drew on two eyes and a mouth. 
(Smiling mouth, screaming mouth, scared mouth---we had all kinds!)
Each child made a bed for Moses with a cotton ball.
Then they put Moses in the basket.
Some children chose to decorate their baskets using Sharpies.


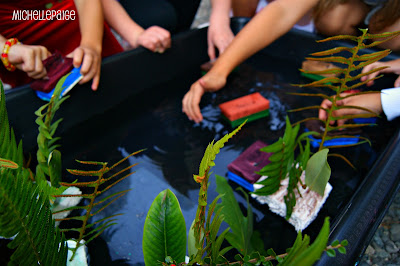
We filled a great big plastic tub full of water for 'the river'.
Blocks of styrofoam were loaded up with greenery to hide the baskets.


Each child tried out their basket making sure they floated in the water.
We practiced telling the Bible story of Pharaoh's daughter finding Moses and how brave and helpful Moses' sister was in offering and getting help.
We talked about how God protects us and how God protected Moses.
We talked about how our brothers and sisters watch out for us,
and how we must watch out for them.
We thanked God for our family.  We thanked God for his protection and watching over us. 

We heard later that one child insisted that Baby Moses join her in the bath at home.
Too cute!
Happy Sunday to you!

 photo arrow.png CONTINUE READING

Monday


Rocks!

It's so fun and easy to whip up a batch of painted rocks!
Use them for table place markers, decor, paperweights, gifts, etc.


Step 1:  Gather rocks and give them a bath.
Rocks that have a wide smooth area are best.


Step 2:  Once rocks are dry, start painting.
We used leftover paints from this project- click here.


Step 3:  Give each rock 2-3 coats of paint.
We only painted the tops, but you could paint the bottoms as well.


Step 4:  Using a Painters pen, decorate the rocks!
Write names or messages and draw designs.
My 5 year old niece wanted to help...didn't she do a great job?!


I might go back and put a coat of sealer over the rocks we made, but haven't got to it yet.

Here's some more rock inspiration I gathered for you!


How adorable are these?!


Remember when we made these for the teachers last spring?  Click here.


And how about some monster rocks via Pinterest.


Or even some ghosts?  Click here for source.

I feel a Halloween craft coming on...


Linking up to:  Home SavvyAtoZ, TodaysCreativeBlog, GingerSnapCrafts, SweetLittleGals, HouseofHepworths,
 photo arrow.png CONTINUE READING

Saturday

Labor Day week-end was filled with  lots of family, fun, sun and...


SAND!
(Yep, that's my beach-lovin' kid.)

Look what we made...sandprints!


We followed the Family Fun version of making handprints in the sand.

Truth be told, we had a few issues with this craft. 
I had forgotten how fast Plaster of Paris dries! 
So...I ruined a ton of plaster and just barely had enough for 4 handprints. 
I had to teach my niece what a craft fail was...
Oh well, that's a lesson we all have to learn sooner or later.

If you would like to create one of these, (without wasting plaster or patience)
follow these step by step directions!


Place 1 and 1/2 cups of plaster in a ziploc.
In a seperate ziploc (this is important!) place 1 cup of water.
(DO NOT MIX UNTIL YOU'RE SITTING ON THE BEACH, HANDPRINTS READY!)
Pack your ziplocs and head to the beach.


Once you're at the beach, have your child push their handprint into the sand (about an inch) and then fill their print with beach treasures.  This one is filled with broken shells.


This print is filled with sticks, rocks and more shells.
When the print is completely filled,
add the water to the plaster and knead the mixture through the ziploc.
This won't take long at all!


 Pour the plaster into the handprint. 
You may need to use a stick to get the plaster to cover all the areas.


Let the handprints dry about 30 minutes in the sun.


 After 30 minutes, dig the sand around the handprint and lift up!  Ta-da!
(This is my adorable niece, Alex modeling for me!)


I love this print with all the rocks!


End-of the summer beach memories captured.
My, their hands are getting so big!


Linking up to: UnderTheTableDreaming, CraftoManiac, TodaysCreativeBlog, GingerSnapCrafts, HouseOfHepworths,
 photo arrow.png CONTINUE READING

Wednesday


For the past several months, my 10 year old daughter has been having trouble getting to sleep.  She tells my husband and I-- that she's scared.  She can't explain exactly what she's scared of, but she 'just is.'  She's been double checking the locks on the doors and windows because something scary could come in.  She's been spending hours awake, not able to relax and sleep. We have tried everything to calm her down!  Special prayers, Bible reading, night lights, sleeping with the lights on, new pillows, different beds, music playing, white noise playing, set bedtime routine, warm baths, door open, door closed, later bedtime, earlier bedtime, no movies or books that may have scary things, no TV, no screen time before bed, etc. etc. etc. 
(Can you sense my exhaustion with this matter?)
 
Well, after much prayer and basically 'crying' out to God for help,
prayers were answered with this notebook idea. 

Yes, it sounds crazy, but this 'FEAR NOT NOTEBOOK' has really made a difference!  Take a look!


We took the 'use what you got' and the 'get it done, quick' approach with this notebook.


Using old magazines, we ripped out pages of pictures that brought my daughter happiness and joy.
 She loves animals, oceans, flowers, fields, etc. 
We also cut out words that would bring a sense of calmness. 

Words like: rest, bloom, relax, sleep, love, rejoice.

We already had a small yellow binder (7"x 9") that worked perfectly.


Next came the assembling. 
We taped (yes, good old Scotch tape) the magazine pictures and words right onto a piece of hole punched paper (5 1/2"x 8 1/2"). 


 We then looked up Bible verses that had to do with God's protection, peace and sleep and wrote them on the pages.
Here's a look at some of the pages we made.


I lay down and slept yet I woke up in safety. For the Lord was watching over me. 
Psalm 3:5


I will lay down in peace and sleep, for you O Lord will keep me safe.
Psalm 4:8


Look at the birds of the air, they do not sow or reap or store away in barns, and yet your heavenly Father feeds them.  Are you not much more valuable than they?
Matthew 6:26

 
But my God shall supply all your needs according to His riches in glory by Christ Jesus.
Philippians 4:19


Do not worry...  Matthew 6:25


On my bed I remember you; I think of you through the watches of the night.
Psalm 63:6


In all your ways acknowledge Him, and He will make your paths straight.
Proverbs 3:6

 
Be careful for nothing but in everything let your requests be made known unto God. And the peace of God, which passes all understanding shall keep your hearts and minds through Christ Jesus.
Philippians 4:6-7


This page would totally GIVE me anxiety (8 babies holding juice on white carpet), but my daughter loves babies!
Cast all your anxiety on Him, because He cares for you.
1 Peter 5:7


And this is the confidence that we have toward Him,
that if we ask anything according to His will, He hears us.
1 John 5:14


We made about 15 pages and then put in a section of lined paper for my daughter to write down her prayers to God.
Her written prayers made me cry. 
To see inside the mind of a very scared/confused adopted 10 year old...it's tough stuff for a mom.


We also put in an envelope to hold extra pictures and words to make more pages.

Using the Cricut cutting machine, we cut out vinyl letters to decorate the notebook.
(I used the Opposites Attract font cartridge.)


And of course, every project needs ribbon!  I punched three holes into the binder's spine.
(The Crop-o-dile punching tool is the best!)


Three different ribbons were threaded through the holes, tied into a double knot and trimmed.


It's been 3 weeks since we have made this notebook. 
(It took me awhile to post this...not to mention that I wanted to see if this book actually worked.)
Week 1:  My daughter used this Fear Not Notebook every night.
She read through each page, wrote out a prayer to God AND went to sleep quickly!!
Week 2:  The Fear Not Notebook was only looked at once or twice with no troubles sleeping!
Week 3:  The Fear Not Notebook is sitting on her nightstand untouched!  She's sleeping effortlessly! 

An answered prayer!


Now we may need this notebook again sometime...
so we're continuing to add new pages, photos and scriptures every so often...
Just so we're ready.


Sweet Dreams!


_________________________________
Linking up to: StuffandNonsense, AtThePicketFence, SassySites, FrugalGirls, SerenityNow, Tatertots&Jello, UndertheTableDreaming, CraftoManiac, J&M'sEyeCandy, InCourage.
 photo arrow.png CONTINUE READING