


Top 12 Posts of Michelle Paige 2012
Thank you so much for reading my blog this year!
I appreciate all the comments and encouragement
to keep on going!
Blogging is a fun hobby for me and you may have noticed that I go in spurts.
Sometimes weeks are full of posts and other times, not so much.
Thanks for hanging in there with me...
you just never know what I'm up to!
Today I'm counting down the top 12 posts of the year.
Starting with Number 12:
Back to School Bash

My nieces were quite surprised when they came to visit and I had set up a school party with food, favors, games and a photobooth.
(I'm trying to win favorite aunt award...just kidding...sort of.)
Number 11:
Organizing a Crafty Kid's Room
 I wish I could say that my son's room still looks this good.
I'm thinking we need another organizing overhaul for this year!
Number 10:
Make Your Own Driftwood Star--Easily
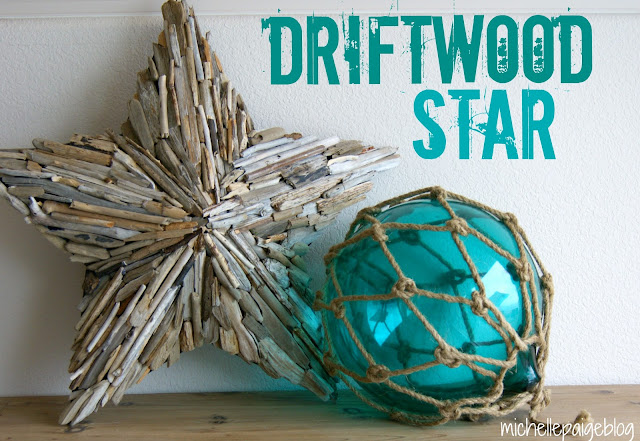
This was one of my favorite projects this year.
I love seeing a part of the beach every time I look at this.
Number 9:
Painted Glass Jars
 This post is actually about my craft fail of painting baby food jars and then putting water in them. (Don't do this!)
They did look pretty for awhile and we enjoyed them at our Mother's Day festivities last year.
Thank you so much for reading my blog this year!
I appreciate all the comments and encouragement
to keep on going!
Blogging is a fun hobby for me and you may have noticed that I go in spurts.
Sometimes weeks are full of posts and other times, not so much.
Thanks for hanging in there with me...
you just never know what I'm up to!
Today I'm counting down the top 12 posts of the year.
Starting with Number 12:
Back to School Bash

My nieces were quite surprised when they came to visit and I had set up a school party with food, favors, games and a photobooth.
(I'm trying to win favorite aunt award...just kidding...sort of.)
Number 11:
Organizing a Crafty Kid's Room

I'm thinking we need another organizing overhaul for this year!
Number 10:
Make Your Own Driftwood Star--Easily
This was one of my favorite projects this year.
I love seeing a part of the beach every time I look at this.
Number 9:
Painted Glass Jars

They did look pretty for awhile and we enjoyed them at our Mother's Day festivities last year.
Numbers 8, 7 and 6 are all from the Valentine Link Party
I hosted last February.
Number 8: Mustache Valentines

A collection of mustache valentine ideas.
Number 7:
Valentines for Boys

Robots, army guys, darts and balloons are just some of the boy valentine ideas found at the link party.
Number 6:
Rockin' Valentine Link Party

Lots of wonderful, talented, creative bloggers linked up their valentine ideas in this post.
Number 5:
Sunday School Craft The Parable of the Lost Sheep

For some reason, any post I do on Sunday School crafts, seem to be pretty popular in the blog world. The problem is, I always forget to take my camera to Sunday School class.
Number 4:
Rockstar Birthday Party
 This party was actually in pre-blogging days for my daughter's 9th birthday. She's now 12.
Number 3:
Father's Day Fishing Party

The funny thing about this party, is that we didn't celebrate on Father's Day, but on May 29th.
Sometimes you have to celebrate on whatever date you can get your family together!
Number 2:
LEGO Valentines

These were little valentine 'gifts' for my nephews.
I haven't even thought about what we'll do this year!
I hosted last February.
Number 8: Mustache Valentines

A collection of mustache valentine ideas.
Number 7:
Valentines for Boys
Robots, army guys, darts and balloons are just some of the boy valentine ideas found at the link party.
Number 6:
Rockin' Valentine Link Party

Lots of wonderful, talented, creative bloggers linked up their valentine ideas in this post.
Number 5:
Sunday School Craft The Parable of the Lost Sheep

For some reason, any post I do on Sunday School crafts, seem to be pretty popular in the blog world. The problem is, I always forget to take my camera to Sunday School class.
Number 4:
Rockstar Birthday Party

Number 3:
Father's Day Fishing Party
The funny thing about this party, is that we didn't celebrate on Father's Day, but on May 29th.
Sometimes you have to celebrate on whatever date you can get your family together!
Number 2:
LEGO Valentines
These were little valentine 'gifts' for my nephews.
I haven't even thought about what we'll do this year!

I'm not quite sure how I'm going to pull off another party as fun as this one?
What a year! Thanks for joining me! I hope you'll continue to read my blog in 2013.
Happy New Year!
Happy New Year!

Linking up to: DelightfullyNoted, AllStarBlockParty, GingerSnapCrafts, WinthropChronicles, WowMeWednesday, SweetLittleGals,


