twitter facebook instagram bloglovin google plus pinterest youtube

Tuesday

It's been awhile since I've shared a
Sunday School craft with you.

Today it's a Shield of Faith.

(You know you're not supposed to leave home without your shield of faith, right?)


Christians are commanded to be strong in the Lord. 
To put on the full armor of God daily. 
"Stand firm then, with the belt of truth buckled around your waist, with the breastplate of righteousness in place, and your feet fitted with the readiness that comes from the gospel of peace.
(Ephesians 6:10-11.)


In addition to this, take up the shield of faith,
with which you can extinguish all the flaming arrows of the evil one."  (Ephesians 6:14-17.)


We are to take up our shield of faith...and that's exactly what we did!

Supplies needed:

-         1 black paper plate
         (find at Dollar Store.)

-         1 (12”) inch sheet of   aluminum foil

-         scissors

-         glue stick

-         1 plastic straw

-         tape (masking)

-         balloon


Directions:


1.    Cut foil into strips and then into small squares.


2.    Using a glue stick, adhere squares to the (front) black side of the paper plate. 


Make a pattern of a cross.


The shield will take on many different looks depending on the ages of your kids/students.


3.    Bend the straw and tape the ends to the back of the paper plate-
to create a handle.

      (It's not so much a handle, but a place for the hand to slip through...
yes, I guess that's called a handle, too.)


4.    Blow up a balloon and tie. 
(I did not think flaming arrows were appropriate for Sunday School, so we settled on a balloon.  You could draw arrows on the balloon with a Sharpie if you wanted to.)


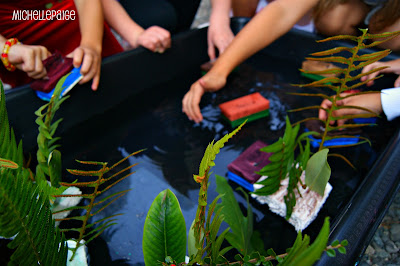
5.    Get with a partner and paddle the balloon back and forth with the shields.  Have the kids shout "I have faith in God!" or "God is on my side!" every time you hit the balloon.
         (I love crafts that kids can play with!  So much fun!)


Stand firm, friends...and take up your shield of faith!


Want to see some more of my Sunday School Crafts? 


Baby Moses Craft and LessonBaby Moses Sunday School Craft @michellepaigeblogs.com

Craft for the Book of Ruth
Story of Ruth Sunday School Craft @michellepaigeblogs.com


Feeding the 5000
Feeding the 5000 Sunday School Craft @michellepaigeblogs.com


Shield of Faith with Balloon Battle
Shield of Faith Sunday School Craft @michellepaigeblogs.com

Phillip and the Ethiopian 
Phillip and the Ethiopian Sunday School Craft @michellepaigeblogs.com


Parable of the Lost Sheep Sunday School Craft
Parable of the Lost Sheep Craft @michellepaigeblogs.com


Valentine's Day Sunday School Craft
Valentine's Day Sunday School Craft @michellepaigeblogs.com

Palm Sunday Craft
Palm Sunday Craft @michellepaigeblogs.com

Easter Sunday School Craft
Easter Sunday School Craft @michellepaigeblogs.com

May Day/Mother's Day Sunday School CraftMay Day Craft Mother's Day Craft @michellepaigeblogs.com


Old Testament Tabernacle Review Craft
Tabernacle Craft and Printable @michellepaigeblogs.com


 photo arrow.png CONTINUE READING

Friday


Well, it's here.


My final card trick for awhile...
Plus you get to find out who these cards are going to.

(You're not going to believe how simple this card is--
I seem to say that every time, but it's true!)


I'm taking plain, blank, light blue cards and
transforming them with ribbon and paper...that's it.
ribbon and paper...well, a glue stick, too.


In a Word Document I printed,
"Thank You For the Meal!" in a pretty font
copied on document copy paper.

I left lots of room to cut the paper
so the greeting would be at the bottom of the card.
I glued my printed greeting to a piece of turquoise card stock.
I glued the turquoise card stock to my light blue card.


I purchased this great printed ribbon awhile back.
It's from Creative Imaginations.
It's a lightweight twill ribbon that says,
"you are wonderful-you are the best-lucky me"


I tied the ribbon in a knot.

Quick, easy and personalized.

Now...I took all the cards I made from my previous posts,
(click here and here and here and here if you missed the posts,)
 and I put them in this colorful canvas bin I found at Target.


I lined the cards up according to their messages..
(Thank you--Hi, Hello--Thank You for the Meal--Blank--With Love)


 I made quick dividers with tag board.
 
I then wrapped the entire basket
with cellophane and added a cute tag.


and handed it to my mom!

Yep, my mom is going through chemotherapy for breast cancer.
She's going to be fine, but it's such a painful journey.  
Painful to go through and so painful to watch.

The one thing she asked for was lots and lots of thank you notes.
Meals, gifts, cards seem to arrive daily...and now she's ready to send out a quick thank you to all!

I love you, Mom!

Linking up to: CraftOManiac, MadebyYouMonday,
 photo arrow.png CONTINUE READING

Thursday

I'm back again.
More monogrammed note cards transformed!


Can you believe these are $1. pack note cards?


Here's the before.  Two packs of note cards from Michaels.

If you've been following me and my card adventures,
you'll know exactly what I did to create these.


1) Peel off the monogrammed labels.
2) Print out the message you need on white card stock.
    Leave lots of room to cut to size.
3) Mat white message on coordinating colored paper and glue onto the front of the card.
4) Tie on a matching ribbon over the top of the paper squares.


I did the exact same thing to the pink floral note cards.


BEFORE:  


Monogrammed note cards found in packs of 6 at Michaels.

AFTER:
Personalized thank you notes with a handmade touch.


I bet you're wondering who is receiving all these note cards...
Don't worry, I won't hold you off too much longer.
Come back tomorrow for my last card making post to find out!
 
 
 UPDATE:
You can can see the rest of my card tricks by clicking on these links:

Quick, Cheap, Cute Notecards from $1. Packs

Transform Monogrammed Cards to Thank You Notes

Create Thank You Notes from Birthday Invitations

Final Card Trick


 photo arrow.png CONTINUE READING

Wednesday


 I'm back again with some more card making tricks for you.
This time I transformed birthday invitations into thank you notes.
Sounds a bit crazy, doesn't it?


Well...I better back up and tell you the whole story...

You see, I actually found this adorable 12 pack of
birthday invitations at my local Goodwill.
Yes, Goodwill. 
The first stop I make in a Goodwill store is the party aisle. 
You just never know what party supplies people are getting rid of.
Lots of time I find new items never used.
Sometimes, products that don't sell quick enough at Target stores,
 end up for sale at the Goodwill.


That's what I'm guessing happened with these cute birthday invitations.
A 12 pack of MaraMi birthday invites
were sitting on the shelf waiting for me.
The set came with purple tags already tied on and matching purple and brown envelopes.  Cute.

I didn't need birthday invitations.  I needed thank you notes...
so I bought them anyway...and changed them up.


It was so easy. 
I cut a white cardstock rectangle to cover the birthday information lines.
I rounded the corners and glued it on.

I covered the Happy Birthday tag with a Thank You sticker
and I tied on a brown ribbon to coordinate with the purple.

(However, you could make these into birthday note cards and leave the tags saying, Happy Birthday.)
Didn't they turn out cute? 
No one will ever know they were once birthday invitations.
Now, don't worry, I STILL have some more card tricks coming up for you.
Have you guessed who all these thank you cards are for? 
Keep on checking in...

Have you missed my other 'card tricks'?
 

You can can see the rest of my card tricks by clicking on these links:

Quick, Cheap, Cute Note Cards from $1. Packs

Transform Monogrammed Cards to Thank You Notes

Fast Cards from $1. Note Card Packs

Final Card Trick and the mystery is revealed!


Linking up to: HouseofHepworths, BeyondthePicketFence, IGottaCreate,
 photo arrow.png CONTINUE READING

Tuesday

More card makings today...and these are fast! 


These cards are not just sort of fast.
Oh no...I'm talking about super fast!  World record fast!

Are you ready?  Four steps coming at you.  Buckle up!
 
ONE:  Buy.

Buy these bright colored monogrammed note cards
in the $1.50 bin at your local craft store.
 
TWO:  Punch. 
Using a square punch, punch out a colored square that matches the card.


THREE:  Stick. Stick.
Stick on the colored square right over the monogrammed letter.
(I used a glue stick.)
Stick on a 'thank you' sticker.

FOUR: Tie.
Tie on a matching colored ribbon.
 
 
 Done!
 
 
Here it is one more time...
Buy.
Punch.
Stick. Stick.
Tie.
 
Now, those are what I call QUICK cards!
 

Now, let's say your local craft store doesn't carry these exact note cards...
It's OK. 
You can do this fast treatment on just about any note card you can find.
Don't believe me?   Just take a look at these links:

Make Quick, Cheap, Cute Cards from $1. Packs

Create Thank You Notes from Birthday Invitations

Fast Cards from $1. Note Card Packs

Final Card Trick


 photo arrow.png CONTINUE READING