twitter facebook instagram bloglovin google plus pinterest youtube
Showing posts with label crafts. Show all posts

Wednesday


The Annual Women's Luncheon at our church had to be moved online due to Covid restrictions. Instead of singing carols, hearing a Christmas message and eating lunch around beautifully decorated tables, the event became an online tea party. I got to help coordinate the goodie bags. Take a look.

Virtual Tea Party for a church event

The event consisted of:
-Christmas music sung by one of our church's members.
-A special Christmas message from a well-known speaker in our denomination.
-Breakout rooms online to fellowship and create an ornament with.
-More music to close our time together.

Virtual Tea Party for a church event

Tickets cost $10. Proceeds went towards the speaker, goodie bags and donating to a special organization through our church.
Women were able to purchase up to 8 tickets to buy an 'online table'. These 'table' guests were put in an online breakout group to interact together during the event.

Virtual Tea Party for a church event

2 weeks before the event, goodie bags were packaged and distributed. Women who lived locally picked up their bags at church. Others were mailed to out of town guests.

Virtual Tea Party for a church event

We advertised our event online with our church services and my friend and I made some short videos explaining the event.

Our event began at 10am and ended at noon. 
All ladies were muted until breakout groups.
Here's how our event timing worked:

10am- Welcome and Announcements
10-10:15am- Christmas carols sung by church member.
(Because everyone was muted, we were able to sing along!)
Virtual Tea Party for a church event

10:15-10:50am Christmas message
Virtual Tea Party for a church event

10:55-11:55am  Breakout rooms 'online tables'
      (conversations, ornament making, discussion on message, etc.)
11:55-12pm Prayer and Final Christmas song, dismissal.


Virtual Tea Party for a church event


Included in the goodie bags:

Virtual Tea Party for a church event
-sheet of instructions
-message note taking sheet with a church pen
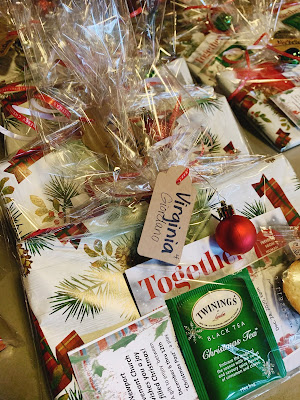
Virtual Tea Party for a church event
 (affiliate links mentioned to help you locate products.)
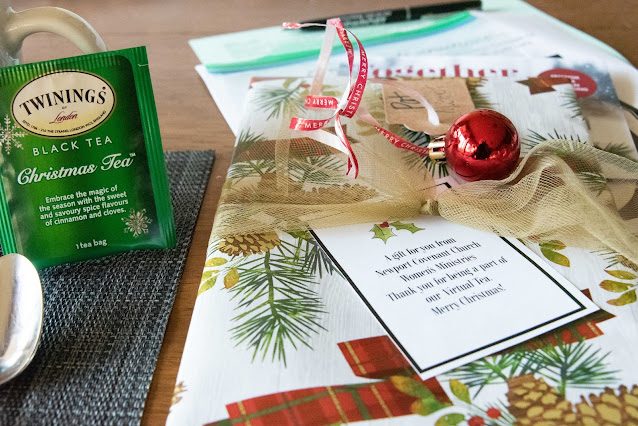
-Twinings Christmas tea bag
-nut-free cookie
-Christmas napkin
These were enjoyed during the video message.

Virtual Tea Party for a church event
-bookmark and postcard with church related events and information.
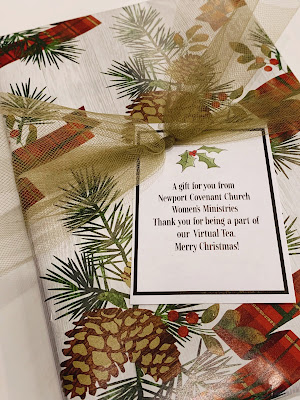
Virtual Tea Party for a church eventVirtual Tea Party for a church event
 (affiliate links mentioned to help you locate products.)
-gift book wrapped. We gave the ladies this book.  A 12 Month Guided Journal Experience to Grow in Faith with a One Word Focus.

Virtual Tea Party for a church event
-bag of ornament making supplies with instructions.

All goodie bag supplies were packaged up in cellophane bags and tied with ribbon, a nametag and a small ball ornament.


Virtual Tea Party for a church event


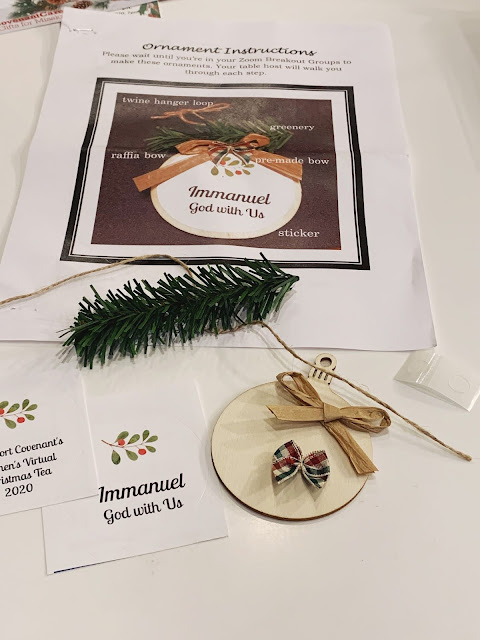
The ornament craft was designed to be very simple to assemble. We didn't want anyone thinking they couldn't do this craft!

Virtual Tea Party for a church event


(affiliate links included to help you locate products.)
We used these flat wood ornament shapes with twine and designed Avery labels to fit perfectly. One for each side of the ornament.
 
Virtual Tea Party for a church event

(affiliate links included to help you locate products.)
Greenery stems were cut to be wrapped around the tops of the wood ornament.

Virtual Tea Party for a church event
(affiliate links included to locate products.)

Raffia ribbon was tied into bows and these plaid bows added a bit of color. The bows were applied to the ornament using Glue Dots. 
The ornament was assembled in the breakout rooms, step-by-step being completed together as a group.


Virtual Tea Party for a church event


Our Christmas Virtual Tea was wonderful! The ladies had such a great time seeing each other online. Many commented that the breakout rooms were even better than sitting around a noisy table not hearing each other.

Ladies Church Luncheon
This was a picture of my table from Christmas 2019. 


Yes, there has been some surprising blessings of having virtual events, but I still miss the in-person interactions, the hugs, smiles and fellowship of physically being together. I'm waiting impatiently for those days to come again. I know you are as well.


 photo arrow.png CONTINUE READING


It's almost Turkey Time! Are you ready to celebrate Thanksgiving?
Guests invited?
Food planned? 
Bought the bird?
Table decorated? 

Make turkey cup favors for Thanksgiving.

Want to add in a little fun?  Maybe you'll want to make these cute little turkey cup favors for your feast?  Filled with popcorn, they give guests the perfect little snack, as they wait for Grandpa to pass the gravy!  Of course they could be filled with other little treats as well.  These turkeys come together...much, much quicker than cooking the bird in the oven!


Make turkey favors for your Thanksgiving table.
Supplies Needed:
Kraft colored cups or snack bowls.  (I used 8.6oz snack bowls.)
Wiggle eyes- big size (2 per cup)
1 small piece of orange fun foam
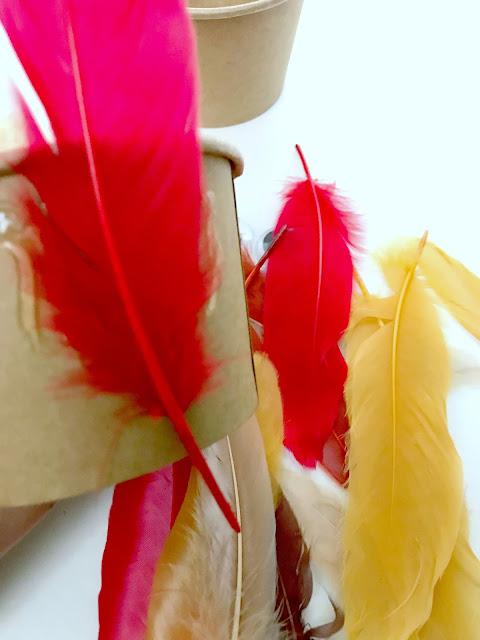
Feathers--  about 5-6 feathers per cup
Red pom pom ribbon (I found this at Target.)
Scissors
Hot glue gun

Turkey craft for Thanksgiving.
1)  Hot glue the eyes on the cup, touching each other.

Turkey craft for Thanksgiving.
It's kind of fun to have all the eyes looking at you!!

Turkey craft for Thanksgiving.
2) Using a small piece of orange fun foam, cut a small triangle and hot glue it on, under the eyes.


Turkey craft for Thanksgiving.
3) Cut a small piece of pom pom ribbon and glue it on next to the beak.

Turkey craft for Thanksgiving.
4) Hot glue feathers to the back of the cup.

Turkey craft for Thanksgiving.
5) Trim off any ends that hang over the bottom edge of the cup with scissors.

Turkey craft for Thanksgiving.


6)  Add popcorn or another treat to the cup.

Turkey craft for Thanksgiving.

These turkeys don't have to watch you eat on Thanksgiving Day, instead, gift them to friends and neighbors.  Simply place popcorn treat in a bag and tie with twine.


Turkey craft for Thanksgiving.

Happy Thanksgiving!  Gobble, Gobble!


Here's some more turkey ideas for you:

Turkey Tags


Candy Turkey Favors


Turkey Washi Tape Sacks


Turkey Cookie Pops


 photo arrow.png CONTINUE READING

Friday


The easiest way to make sweater pumpkins with no sewing and no glue.

I grew up with a big orange cat (think Garfield-looking) who was named, Pumpkin. I've seen many pictures of myself as a baby, with Pumpkin the cat laying beside me. Pumpkin loved me and I loved him. Pumpkin would choose my bed to sleep on every night. He would snuggle against my leg and purr as I slept. Pumpkin would come to me first, to be petted and brushed. Pumpkin wasn't allowed on the couch, so as I sat on the couch, he would plop his body on my feet--just hoping I would scoop him up and put him in my lap. Pumpkin and I were buds. I remember being so sad when we finally had to put Pumpkin to sleep, when I was in middle school. Oh, Pumpkin, I miss you!  Hold on, let me grab a tissue.
I find it so interesting that all these childhood memories came back to me when I started crafting up these sweater pumpkins. I wonder if the soft orange sweater triggered my memory?  Not sure.  Whew!  I didn't mean to get all emotional over a pumpkin craft.

Let's move on, shall we?
The easiest way to make sweater pumpkins with no sewing and no glue.

Oh yes, sweater pumpkins.  Soft, cute and did I mention EASY! I only do easy crafts and this one totally qualifies.
Just follow the steps and you'll be crafting up your own sweater pumpkins in no time...oh, I should mention, they're addicting!  Make one, and you won't be able to stop!  They're so fun!

**If you're more a video watcher, instead of a read the directions type, scroll down for the video link.


The easiest way to make sweater pumpkins with no sewing and no glue.

Step 1: Find an old sweater or buy one at a thrift store. Solid colors are the easiest. Soft and fluffy ones are my favorite!
Step 2: Using a Sharpie, trace around a paper plate (or anything round) directly on the sweater. Any size works, I used a 12" paper plate for my pumpkins. Feel free to go smaller or bigger.
Step 3: Cut out the circle.

The easiest way to make sweater pumpkins with no sewing and no glue.

Step 4: Pour about 1/4 cup of beans onto the center of the sweater circle. The beans help weigh down your pumpkin and sit right. (You could use other colors of beans as well.)
Step 5: Add stuffing on top of the beans. I used two full handfuls. Use as much as you can for poufy pumpkins.
Step 6: Gather the sides of the circle around the stuffing, stretching the sweater into a round ball, holding the ends in your hand.

The easiest way to make sweater pumpkins with no sewing and no glue.

Step 7:  Hold the ends tightly, checking to see that all the edges are pulled up.
Step 8:  Tie a rubber band tightly to hold the shape.
Step 9:  Cut 4 pieces of twine that can extend all the way around both sides of the pumpkin. Lay the pieces out like the image in picture #9.

The easiest way to make sweater pumpkins with no sewing and no glue.

Step 10:  Place pumpkin on top of the cut twine pieces.
Step 11:  Gather the twine pieces up along the sides of the pumpkin, holding them in your hands.
Step 12:  Secure the twine pieces with a rubber band.  This goes right over the first rubber band.

The easiest way to make sweater pumpkins with no sewing and no glue.

Step 13:  Adjust the twine pieces evenly and pull them tightly to make spines around the pumpkin.  Tie another rubber band around the top edges to keep the pieces out of your way.
Step 14:  Tie on twine, keeping it attached to the roll. You can also hold back to two long pieces of twine, to make vines.
Step 15:  Tightly, wrap the twine around and around the sweater fabric pieces, creating a stem.

The easiest way to make sweater pumpkins with no sewing and no glue.

Step 16: Pull tightly as you wrap covering up the two rubber bands.
Step 17:  When stem is the length you like, tie off tightly and trim the excess material.
Step 18:  Trim evenly to make a flat top to your stem.
The easiest way to make sweater pumpkins with no sewing and no glue.

(Optional) I know I told you no glue, I sort of stretched the truth ...but you don't HAVE to do this step!
Step 19:  Use glue or Mod Podge to curl your vines.
Step 20:  Rub glue over the twine to be curled.
Step 21:  Curl the gluey twine around a Sharpie marker and hold until it takes shape.

The easiest way to make sweater pumpkins with no sewing and no glue.

Step 22:  Release twine from Sharpie. Re-curl if needed.
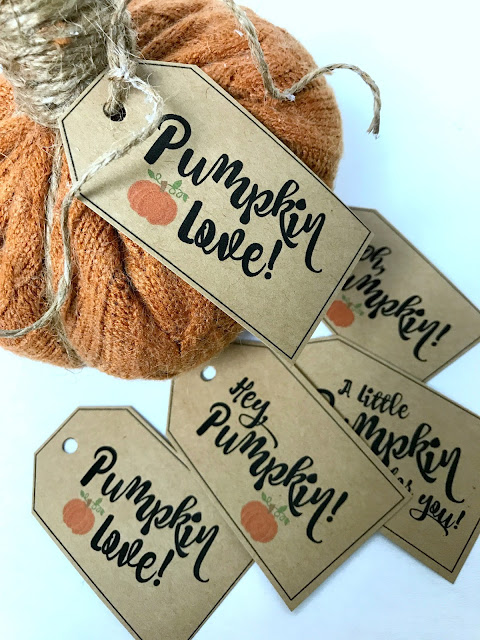
Step 23:  (Optional) Print and tie on a Pumpkin tag.
Step 24:  Give away pumpkin or keep for yourself and enjoy!


The easiest way to make sweater pumpkins with no sewing and no glue.

 Click here to print your own pumpkin tags. 
I printed my tags on kraft cardstock.  They could be printed on white cardstock as well.


The easiest way to make sweater pumpkins with no sewing and no glue.

Try making all different sizes!  Have fun!
I'd love to see how your sweater pumpkins turn out. Drop me a note or a picture.

VIDEO**To watch a video on how I made these, click here. 
The easiest way to make sweater pumpkins with no sewing and no glue.


Want another simple pumpkin idea?
Try these Pumpkin Placecard Holders made from Dollar Store supplies.


Or how about these sewn up paper sack leaves?


 photo arrow.png CONTINUE READING