twitter facebook instagram bloglovin google plus pinterest youtube

Monday

A Simple Halloween Mantel


Easy decorating for Halloween


Well, we finally decided that the TV was not going above the mantel in our new house. In our old house the giant black box was above the mantel, which meant decorating the mantel was out.  (Not that I didn't try.)
When the TV is above the mantel, the main attraction of the room becomes...you guessed it, the TV.

I actually went back and forth about the TV placement decision for quite awhile...10 months to be exact. I asked many people and family members for their opinions. 

A neutral colored living room allows me to add pops of color in any shade.  This month it's orange!

Easy decorating for Halloween

And with the TV out of the way, I can have a Halloween mantel, oooooh, how fun!


Easy decorating for Halloween
I found my old, cracked, stained glass black window and put a paper backing behind it.  On top I hung this black feather wreath I've had for years. (they sell these at Target.)
A few tall candlesticks (all found at second hand stores,) gives the perfect Halloween touch.  


Real mini pumpkins straight from the pumpkin patch and the polka dot orange and black ribbon add to the theme.  (ribbon from Hobby Lobby.)  More ribbon looped around to add to the Halloween colors. 


Easy decorating for Halloween


Easy decorating for Halloween

Oh, I almost forgot.  The black crow
(from Michaels) is perched on a candle.  My son thought the crow was 'epic'.  

I always forget how much the kids appreciate the holiday decor...even as teenagers.
Apparently, you're never too old for Halloween?  
(Well, that's what the kids are saying...)


Happy Halloween!

Easy decorating for Halloween


 photo arrow.png CONTINUE READING

Have you been BOO-ed?
It doesn't sound like a good thing...but it is!


You've been Boo-ed!
A few days ago, I opened our front door to this.
(Do you have any idea how fun it is to open your door to a little surprise?  I think I was more tickled than my teenager kids were!  It's also nice to not always be the one to start these things. I'm really loving this new neighborhood.)

You've been Boo-ed!


It was a little sack filled with Halloween treats and this note.


You've been Boo-ed!

So here's how it works.

Go to this site:  www.beenbooed.com

You've been Boo-ed!
Print out two copies of the 'We've been BOO-ed' poem and sign.


Fill two bags with Halloween goodies and include a copy of the BOO-ed poem/sign in each bag.

You've been Boo-ed!

To make a treat cup spider, click here!

You've been Boo-ed!

The bags can be as small and simple as you'd like.  I used some festive orange gift bags I had and this super fun polka dot tissue paper...why? because it's fun!


You've been Boo-ed!

Then, wait until dark...deliver the bags to two different neighbors.  Ring the doorbell and run!
(This is when my teens finally got excited!)

You've been Boo-ed!

Now, be sure to cut off the 'We've been BOO-ed!' sign and tape it to your door.  
You'll want others to know you've already been BOO-ed.


You've been Boo-ed!


This website also has an option for you to do this in an office setting as well.
If you really want to go all out...check out these 'Been BOO-ed' ideas!  Click here!


Happy Halloween!  Hope you get BOO-ed!


 photo arrow.png CONTINUE READING

Wednesday


It's a Pun-Filled Donut Themed Party!


Hope you're not one of those people that say... "I 'donut' like puns."


My little brother had a birthday, umm...last fall.  We had just found out we were going to move, so I needed a quick, fun party theme that would be easy to pull off.
My brother's favorite treats are donuts and Diet Coke.  
(Since then, Diet Coke is no longer in his diet, but nevertheless, we talking about last year. I'm sure donuts are still a big part of his diet!)
Check out how fun and 'punny' a donut theme can be!


First I downloaded these donut tags from here. 
Black and white striped paper cups (from Pick Your Plum) are filled with powdered donut holes.  Donut labels were taped to black coffee stirrers.

The table was covered with black butcher paper.  I used a white chalk marker to write all kinds of donut puns.


Just in case you need some donut puns...here's a few!


We donut believe you're another year older!
Here's to a great jelly and fun-filled year.
We love you with our 'hole' heart.
We donut know what we'd do without you.
Are your eyes 'glazed' over from a sugar high, yet?
We love ya... and not just because you make a lot of dough.

(This one is a bit 'tongue-in-cheek'...because my brother works for my husband.)

and my favorite...
You're older today...it hurts, donut?!


Mini Diet Coke cans were at each place setting.  I taped a paper straw (that I cut to size) with washi tape directly to the can.


I also downloaded these printable donuts.  They look so real!
A bit of printing, cutting and taping and I assembled a fun garland.


I put one printed donut under each glass plate.  And take a look at the donut hole tower!


These were the best instructions on how to make a donut tower.
My daughter thought the donut tower was amazing and had to have one at her birthday party!  Click here to see.


I also made a double layered chocolate cake.  Buttercream frosted, chocolate jimmies sprinkled and lined with mini chocolate donuts, of course.  Quick and easy!

And there you have it.  A festive donut celebration!


 Did you know that National Donut Day is the first Friday of June?
Krispy Kreme hands out free donuts on that day--if you don't mind standing in their mile long line?


This post contains affiliate links to help you locate products.


Linking up to Tatertots&Jello Link Party Palooza,
 photo arrow.png CONTINUE READING

Friday


Well, well, well... I've finally got a blog post up to share with you!  (I almost made it through the month without blogging!  Does that tell you how great our summer has been? Such a great one. )  

Today I'm sharing my mother-in-law's hiking themed birthday party.
Her most favorite thing to do is to hike.  She's been in a weekly hiking group for years and she just loves it when the family joins her hiking.  So...for her birthday we all headed up to Whistler, BC for a hiking birthday celebration.
Did I mention that it's her 70th Birthday? 
(One of her hiking friends made her this bib to wear while she celebrates.)


Of course we had to have some party décor to help jazz up the celebration. 

A simple pennant banner was made with my Cricut machine.  Styrofoam cones (trees) wrapped in coordinating wrapping paper and balloons added some color to the mantle.  (We stayed in cute, ski-lodge townhomes in Whistler Village. Loved the river rock fireplaces!)


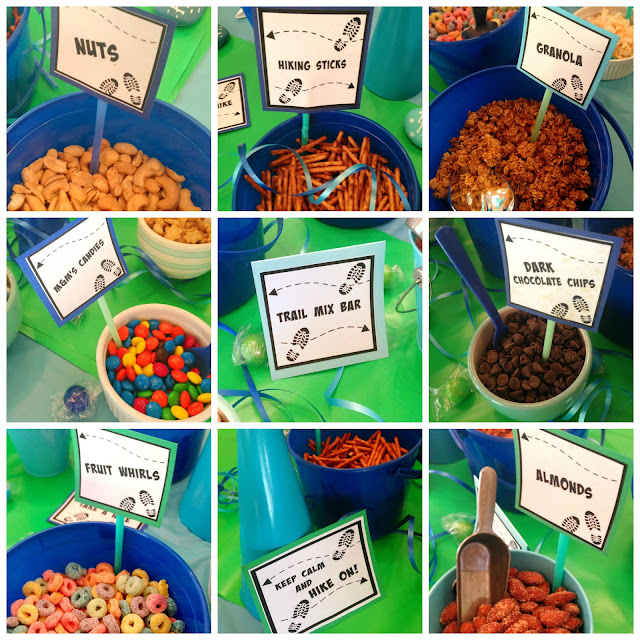
Clever signs and food labels always elevate a party to a fun celebration!  The pretzels were labeled 'Hiking Sticks'.
'Ants On A Log' were actually chocolate chip 'ants' on peanut buttered celery sticks.
(These were gone in a flash!  I guess no one in the family really cares for raisins?)


The grandkids loved having a 'Pre-Hike Birthday Picnic Meal.'


Whistler water bottles were very appropriate for our party.


A blue plastic tablecloth with a green wrapping paper runner lined the table.  Paper plates and colored buckets were from Party City.  Napkins from IKEA.  The painted rocks were from this post many summers ago.
  (Yes, I hauled all this party gear into Canada.  No, I didn't try to explain to the border guards why we needed so much 'luggage' for one week-end.) 


Colored straws work well when placing signs in the foods.
Print out signs, glue to colored cardstock, trim and tape the sign onto the end of a straw.
(See bottom of post for links to print your own signs.)


After lunch, we all made our own trail mix for the birthday hike.(I basically raided the bulk food section of our grocery store!)


Each person was handed their own tiny paper sack to fill.


Can you even imagine the excitement from the kids when I said, "Make your own."!?

There WAS one rule. 
No eating the trail mix until you're on the trail.
(There may have been a little rule bending--from the adults?)


And one more thing for the hike... 

A Nature Hunt Hike Challenge. 

This was a great way to keep the kids interested in the hike.
During the hike they were to gather 6 things and place them in the bag.
1.  Something soft.
2.  Something smooth.
3.  Something green.
4.  Something rough.
5.  Something pretty.
6.  Something Nana would like.


When we returned home from the hike, everyone did a little 'Show and Tell' presentation for Nana.  The creativity was off the charts!


And the hike?!  The hike was spectacular!  Riverside Trail along the Cheakamus River was a perfect hike for our family.  We watched the river on most of the trail and stopped halfway to turn around at a small suspension bridge.  The kids and adults loved it.


Know what else they loved?  Coming home to my sister-in-law's homemade blackberry pie for dessert!


Happy Birthday, Nana!


PRINT YOUR OWN HIKING SIGNS AND LABELS:

Hiking Sayings Printables click here.


Hiking Labels to print- click here.


Hiking signs to print- click here.


Nature Hunt Hike to print- click here.


Trail Mix Labels to print- click here.


Want to see more of Nana's Birthday Parties?

Balloon Party


Sunshine Party


Beachy Starfish Party


Puppy Party


 photo arrow.png CONTINUE READING