twitter facebook instagram bloglovin google plus pinterest youtube

Friday


It's wedding madness over here!  

I'm helping my friend decorate for her rustic wedding and wanted to share what I'm working on. 
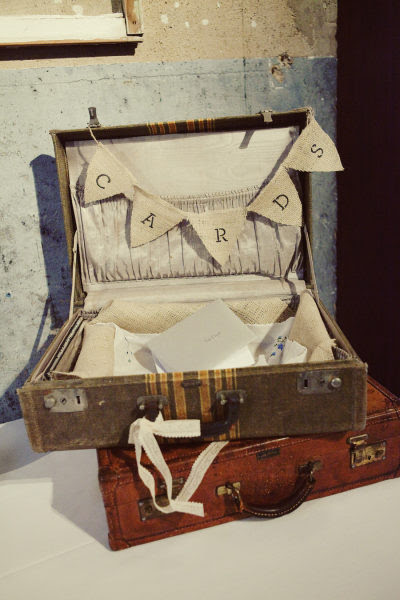
Today it's a vintage suitcase for holding wedding cards.


This old suitcase belonged to my great grandma.
It's been sitting in my home for years and it's finally getting some use!
I put some vintage linens inside and made
the CARDS burlap pennant banner with materials I had leftover from this project.

The bride is thrilled!

I don't know who came up with the idea to have guests put their cards in a suitcase...but it's genius.
The Internet is filled with so many wedding card suitcase inspirations.
I just have to share a few favorites.

I love how this suitcase is sitting on a luggage rack.
I'm thinking I need to pack one more thing to go to the church!


I love the colored ribbon on this one.
A pink ribbon might look good added to my suitcase?
vintage suitcase wedding card box


I like how they stacked the suitcases and tied a bow on the handle.
I might add a bow, too.

Source:  Style Me Pretty


Check out the clothesline inside this suitcase/briefcase. So cute.


Source:  Brides Of Oklahoma


Now this one is quite the display!

Vintage suitcase card box, dresser & door by GreciaParra
Source:  Indulgy


And here's one on Etsy that you can buy for $120.00
Notice how the entire suitcase is lined with sheet music and burlap.
Vintage Suitcase For Wedding Card Holder for a Rustic Style Wedding
Source:  Etsy


I like the burlap flowers.  I might need to try my hand at making some of those!
I've got to get to work!


Click here if you missed my Wrapped Burlap Mason Jars.


Remember you can follow me on Instagram, Twitter or
Facebook to see the latest with the wedding decor.

Click here to see the entire wedding reception.


 photo arrow.png CONTINUE READING

Wednesday

One of the easiest snacks to serve for a party is popcorn!
 It can be made ahead of time. (No last minute stressing!)
It can be left out the entire day. (No need for refrigeration.)
It can be served in the cutest containers.  (Always a bonus.)
Everyone can go back for more and more and more. (Less worry for me.)
Plus, there's so many great popcorn recipes to try.


How about some Sweet and Salty Pretzel Popcorn?


It's the perfect blend of salted pretzels and popcorn with sweet white chocolate.  Mmmm!
Click here for the instructions.
(I didn't put any M&M's in mine...gasp!  Maybe next time?)

or...

How about USA Birthday Cake Popcorn?

This recipe uses a cake mix!  Click here for the instructions.
I used 4th of July sprinkles for the occasion, of course!


Or...

The ever popular tried and true, Buttered and Salted Popcorn
No instructions needed on this one!  

A couple bags of your favorite microwave popcorn does the trick...
or if you're an air popper popcorn maker, that's good, too!


Decorate your wall and table. (Decor from DollarTree)


Place the popcorn in plastic buckets and label each one.


Give everyone their own popcorn box to fill and refill.


Now, sit back and celebrate!
Hope your 4th is 'poppin' good!


Here's some more 4th of July ideas for you!


 photo arrow.png CONTINUE READING

Monday


Labeling cups is always an issue at my home, especially in the summer.
We often have a crowd over for parties and get-togethers and that means lots of cups.
 Our 'party' cups are usually plastic cups with a Sharpie written name on them.  This bothers me.

 The plastic cups are ugly, they ruin the party decor and sometimes (depending on handwriting) it's hard to read the names.  Not to mention the waste they create when our friends leave.

Drum roll please....this just might change your world like it did mine?


Enter Washi Tape!  Washi Tape to the rescue!
 (I told you that Washi Tape is fast becoming my favorite craft item! I'm almost saying goodbye to ribbon...almost.  No, not really.)


Here's how to create these:
Punch out paper shapes, hole punch the tops and put them on a jump ring (or a binder ring).
Thread the ring on a piece of Washi Tape and stick the tape all the way around the cup.
The Washi Tape is wrapped around the cup and it stays until you're ready to take it off.
Washi Tape comes off of everything!

Wait a minute...everything?  
How about putting it on a real glass?  Oh Yeah!


No more guessing whose glass is who's?  That is what I call a cute and clever party glass!
Plus, no sticky residue when you pull it off.


You can even take the tape off, put it on a piece of waxed paper
 and reuse it again when you need to! 
Seriously, why didn't I do this sooner?


And how about this little cutie?


Look how fun these glasses looked on the table for Father's Day!


and what about this!?!


Yep, it's a world changer for me.


Happy 4th of July!


Here's some more 4th of July ideas for you!


 photo arrow.png CONTINUE READING

Sunday


One of my family's favorite desserts is Crispy Rice Treats. 
There's something about melted marshmallows and cereal that just seem to go together?  
I like how fast I can pull them together with only a few ingredients.


This treat is even better when the kids can hold them on a stick...no 'sticky' fingers!
The layers are perfect for the 4th of July or any party with a color theme.


The trick is using plastic cups.

Spray the cups with cooking spray.
I used small plastic cups.


You'll need to make 3 separate batches of Crispy Rice Treats...but not all at once.

Make the top layer first.
I melt the marshmallows in the microwave with a tiny bit of butter.
(1/3 of the marshmallow bag was used for each layer.)
After the marshmallows are melted, add the food coloring.

*I only had these gel things for food coloring, and I wouldn't suggest them.
They were not quite as bright as I had hoped.

My 4th of July treats turned out more like pastel Easter treats.
No worries, the kids still loved them.


After adding your coloring and your melted marshmallows are the color of your choice,
stir in the Crispy Rice cereal.
(I used about 1-1/2 cups.)


After the cereal is mixed in, work quickly, and fill the bottom of each plastic cup with the 1st layer.
(I made a fist and sort of pounded it in.)

 *My kids totally wanted to help with this part...wearing plastic wrap around their hands, of course.)


Repeat the process with the next colored layer.
Melt marshmallows, add coloring, stir in cereal, pound on next layer.

*I left my middle layer plain-'white'.


After the 3rd layer, let cool completely and remove from the cups.
Use a table knife. Run the knife around the cup and they will slide out easily.


Melt a tiny bit of Candy Melts or white chocolate in a microwaveable dish.
Dip the end of a lollipop stick in the chocolate...


and then into the crispy rice treat.


Let cool and harden.


Serve and enjoy!


 photo arrow.png CONTINUE READING