twitter facebook instagram bloglovin google plus pinterest youtube

Wednesday

Have any mentors that need a little thoughtful thanks?
How about this quick idea?

Mentor gift using Mentos candy @michellepaigeblogs.com
Take a pack of Mentos candies.
(My kids love these things!)


Mentor gift using Mentos candy @michellepaigeblogs.com

Print out and trim up a few blue letter 'r's'.
Mentor gift using Mentos candy @michellepaigeblogs.com
Click here to print. 


Tape the letter 'r' right over the letter 's' on the package.
Mentor gift using Mentos candy @michellepaigeblogs.com

Use Washi tape to cover up the word 'mint' on the package.
I wrapped the tape around the package a couple of times.

(The 'mint' word was distracting to me, it might not be for you?)

Mentor gift using Mentos candy @michellepaigeblogs.com


Click here to print out a 'Thank you for being a great'....card.

 Mentor gift using Mentos candy @michellepaigeblogs.com


Hole punch two holes in each card under the word, 'great'.
Mentor gift using Mentos candy @michellepaigeblogs.com


Thread curling ribbon through the holes.
Mentor gift using Mentos candy @michellepaigeblogs.com


Tie the candy onto the card.
I put a tiny piece of tape under the package to secure.
Mentor gift using Mentos candy @michellepaigeblogs.com

Add a little note to personalize at the bottom.

These little thank you's were perfect for the youth mentors at our church and for my son's piano mentor.


Linking up to: WowMeWednesday,


 photo arrow.png CONTINUE READING

Tuesday

Seriously?
Who in the world ever thought that heating and reshaping ice cream cones was a good idea?  Hmm?
Who put all those sugar cone cornucopias on Pinterest with the 'easy and quick to make' comment on them?  I'd like to know who!
I must be missing something?!


Those 'cute' sugar cone cornucopias are not easy and are sure not quick! 
Cute is questionable right now.
I'm warning all those who are wanting to have little cornucopias sitting on their Thanksgiving table...
This was a pain.

If you think you're game and up for a sticky challenge, read on.
 
Start with sugar cones.  Cheap or expensive--I tried different brands and they all work the same...not too well.

 
Dip the bottom of the cone in water for 20 seconds, then heat the cone in the microwave for 15 seconds.
Don't mess with the timing...trust me,
20 seconds in water,
15 seconds in the microwave.
 
 
The cones turn into a sticky mess.  Other tutorials say to wrap the ends around a pencil.  Well, I tried that and then I had a dozen sticky, gooey pencils to deal with.  It didn't work too well.


My advice is to use your fingers (yes, they'll get sticky) and roll up the end of the cone yourself.  Place the cone (curled-side down) on a sheet of waxed paper. 
The cones will immediately want to roll and uncurl. 

I'm not lying. 
Cones do not want their ends to be rolled up and certainly do not want to dry flat on the counter for ease...I mean, really.

(And one other thing...if you get the cones too wet, the entire cone will unwrap.  Yes, it's fun watching the cone come apart on you.  I can't wait for someone to come up with a craft using an unrolled ice cream cone...won't that be neat?!)
 
 
After much trial and error and frustration...I finally gathered big spoons and 'weighted' each cone down with the pressure of a spoon.  You'll need quite a bit of counter space to pull this off...just saying.


I totally thought these things would dry in an hour...
Oh, was I mistaken!
24 hours later!  Yes, I cooked dinner, made lunches and did dishes around these cones.  No way was I going to move these.

24 hours later I had 'fairly' cute cornucopias.


 However, do you notice that the part that was dipped in water dried a darker shade?  Ugh.


Well, don't say I didn't warn you.

I'm pretty sure this will be the first and last time these cornucopias will make a showing at our Thanksgiving table!  Hope the kids like them.
 

I wonder how the pilgrims did this?

Happy Thanksgiving!


Linking up to: WowMeWednesday,
 photo arrow.png CONTINUE READING

Monday

I love 'nutty' gifts!
 
 
They're easy, simple and healthy...
unless someone in your household has nut allergies.(If that's the case... maybe you should stop reading?)


Oh, good, you're still reading...
Nut allergies must not be a concern?
 
 
3 easy supplies to make this...can't beat that!


Purchase a bag of nuts.  (Pistachios are always lovely.)
 
Print out the nutty tag.  (Click here.)


Sign back of tag and hole punch.  Tie tag onto bag of nuts.


Deliver.


In my book, you can never thank people enough.
This nutty gift was delivered to the kid's bus driver, piano teacher and a few men teachers.


Oh, nuts!  I've got to get cracking on my Thanksgiving food prep.
Happy Thanksgiving to you!
So thankful!


Linking up to: TimetoSparkle,
 photo arrow.png CONTINUE READING

Friday


Need a quick and easy way to tell someone you're thankful for them?  How about this? 
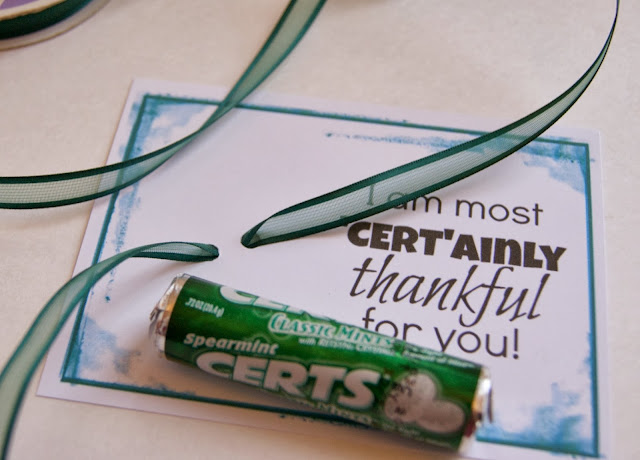
 Quick, little thank you gift. Print out tags, attach Certs.

It doesn't take much to let someone know they're appreciated.

Quick, little thank you gift. Print out tags, attach Certs.

1 package of CERTS (found in packs of 3 at DollarStore.)
1 printable tag
1 piece of ribbon or tape
Hole punch (optional)


Click here to print I am most 'CERT'ainly thankful for you!
Quick, little thank you gift. Print out tags, attach Certs.

Click here to print We are most 'CERT'ainly thankful for you!
Quick, little thank you gift. Print out tags, attach Certs.

After printing out the tags, trim off the edges.

Quick, little thank you gift. Print out tags, attach Certs.
Hole punch two small holes side by side.

Quick, little thank you gift. Print out tags, attach Certs.

Slide a piece of ribbon down through the hole on the right,
and up through the hole on the left.
Quick, little thank you gift. Print out tags, attach Certs.
Place a package of Certs in the middle and tie the ribbon ends into a bow.
Quick, little thank you gift. Print out tags, attach Certs.
Curling ribbon works well, or just use a piece of tape.
Quick, little thank you gift. Print out tags, attach Certs.

I get to deliver 20 of these to our church's preschool teachers today.  
We're so thankful for the work they do!


Linking up to: FridayFavs, LinkPartyPalooza, Pin-ItParty, TimetoSparkle,
 photo arrow.png CONTINUE READING

Thursday

Here's another quick turkey favor idea for
the kid's Thanksgiving table.
Cute and easy!
Here's the supplies I used.


Roll out strips of colorful Washi tape down the mini paper sack.

Cover the entire front of the sack.
Trim pieces and fold the excess tape
over the back of the sack to secure.
No pattern to follow, just cut.
Cut little triangle shapes from orange colored cardstock, for the turkey's nose.
Cut little squiggly shapes from red colored cardstock for the turkey's snood.
Using glue dots, adhere all the pieces to the front of the sack.
For extra flair, tie a piece of twine or jute around the bag.
Add a few packages of Sixlets candies for the 'feathers'.
That's it.
These are so easy, you could have the kids make their own!


Set a turkey sack at each place setting.
Gobble! Gobble!
Happy Thanksgiving!


More turkey ideas:


Linking up to: TheFrugalGirls Chic&Crafty,
LinkPartyPalooza,
TimetoSparkle,
WowMeWednesday,
 photo arrow.png CONTINUE READING